Thanksgiving Crafts

paper turkey
Decorate your Thanksgiving table with some of our innovative crafts. Zoonar RF/Getty Images

Get into the spirit of the holiday season with these Thanksgiving crafts.

Thanksgiving in America is a time for us to think of what we are thankful for in our lives. The holiday was first celebrated way back in 1621, when the Pilgrims shared a feast with the local Native Americans to give thanks for the colonists' first successful harvest.

Advertisement

Thanksgiving was observed by some after that first November feast, but it wasn't until 1863 -- thanks to the efforts of a woman named Sarah Josepha Hale -- that Abraham Lincoln decreed Thanksgiving a national holiday.

Today Thanksgiving is one of the biggest holidays of the year. Try out these crafts to help celebrate:

Orangey Popcorn Balls

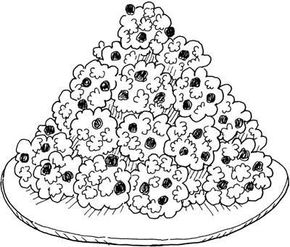
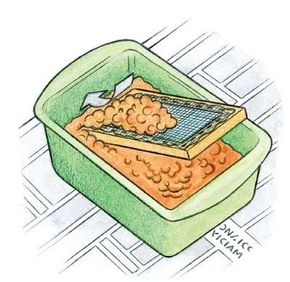
These delicious popcorn balls double as a centerpiece for your holiday table.

Stand-Up Pilgrims

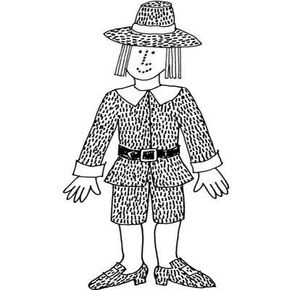
You'll have some unexpected guests this Thanksgiving holiday -- a group of pilgrims.

Yam Vines

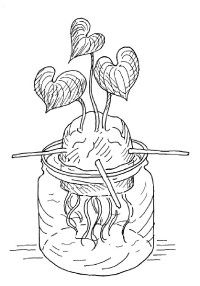
Yam vines are pretty and easy to grow. Learn how to grow your own Thanksgiving plants.

"Thankful" Message Box

The entire family will be grateful for this Thanksgiving message box.

Harvest Candle Holders

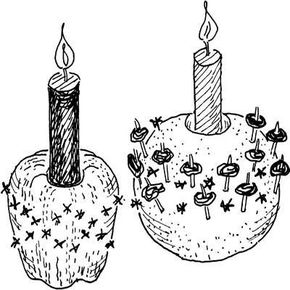
Can fruit be a candle holder? You bet! Learn how to make some Thanksgiving candle holders here.

Pilgrim Seed Pictures

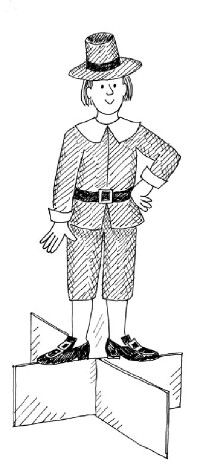
The pilgrims and Thanksgiving go hand in hand. With a little patience and some concentration, you can make some neat three-dimensional pictures of the pilgrims to decorate your holiday home.

Yummy Yammy Muffins

Why let the adults do all the cooking this Thanksgiving? Get into the holiday fun with these super-yummy muffins.

Headdress Napkin Rings

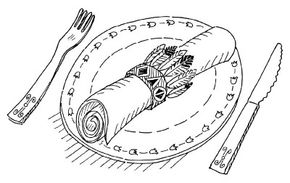
Native Americans played an important role in the first Thanksgiving. Create fun headdress napkin rings to decorate your table.

Balloon Parade

Is the Thanksgiving Day parade over? Not quite! Here's an easy way to make your own parade.

Birdie's Thanksgiving House

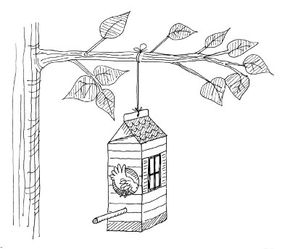
All living creatures have something to be thankful for. Birds will love the house you create for them.

Veggie Magnets

Spruce up your holiday refrigerator with these Thanksgiving veggie magnets.

Handmade Paper

Imagine your relatives' surprise when they receive a Thanksgiving card from you written on paper you made yourself. Learn how to make holiday paper here.

Harvest Bookmark

Thanksgiving is a good time to read all about the history of the pilgrims and the Mayflower. You won't lose your place in your book with this Thanksgiving bookmark.

Thanksgiving Napkin Rings

Add some holiday cheer to the Thanksgiving table by using napkin rings you made yourself.

Pine cone Trees

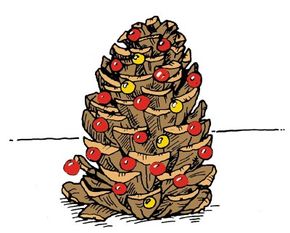
Don't leave those pine cones laying in the yard. You can use them to make beautiful Thanksgiving decorations -- learn how here.

Cornucopia Copies

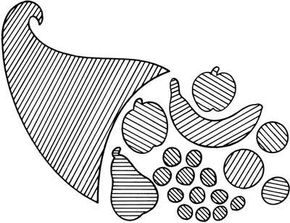
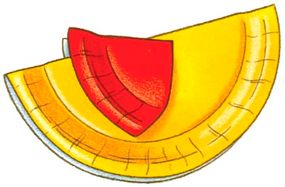
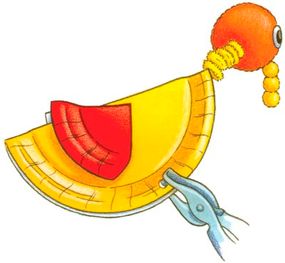
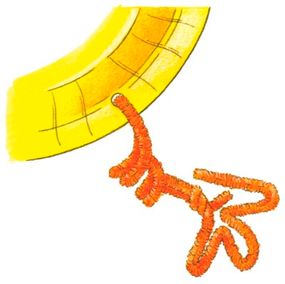
A cornucopia means an abundance. You'll have a cornucopia of cornucopias after making this craft.

Autumn Leaves Puzzle

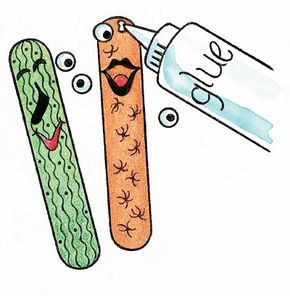
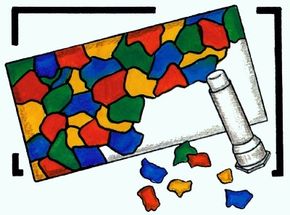
Nothing says you are thankful for others like giving a hand-made gift. This puzzle will surely brighten the holidays.

Pumpkin Balloon Fun

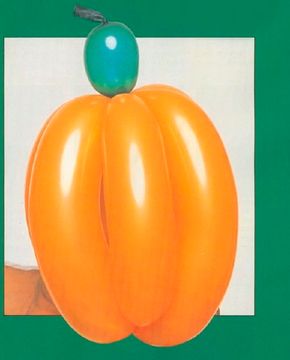
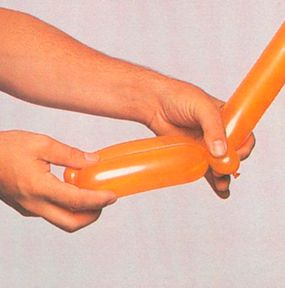
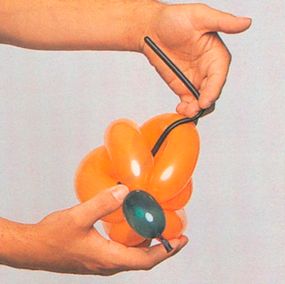
This easy-to-make balloon pumpkin will impress your friends and family.

Gooney Bird

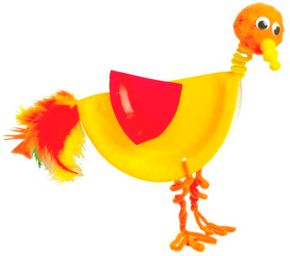
This silly turkey will add a light-hearted touch to your holiday decorations this Thanksgiving.

On the next page, you'll learn how to make a fun craft that is also delicious.

For more kids' crafts and fun activities, see:

Advertisement

Orangey Popcorn Balls

Orangey Popcorn Balls Thanksgiving Craft

These scrumptious Thanksgiving popcorn balls make a pretty centerpiece when piled into a pyramid.

What You'll Need:

  • 1-1/2 cups popcorn kernels
  • Cooking oil
  • 1 package orange gelatin
  • 1 cup sugar
  • 1 cup corn syrup
  • Orange food coloring
  • Saucepan
  • Large bowl or serving platter
  • Butter
  • Honey
  • Cranberries

Get the whole gang involved in making this edible centerpiece. Everyone loves the sound of popcorn pinging away in the pan while it pops. Have an adult help you pop the popcorn.

Advertisement

After the corn is popped, mix the gelatin, sugar, corn syrup, and a few drops of food coloring together in a saucepan. Have the adult heat and stir until the mix reaches a full boil.

The adult should pour the syrup over the popcorn. Stir it well to thoroughly coat all the kernels. Let the popcorn cool a few minutes.

Now for the really fun part. Butter your hands, and shape the popcorn into orange-sized balls. Arrange the balls in a stacked pyramid shape on a serving platter or in a large bowl. If you have trouble balancing the popcorn balls, use a little dab of honey as "glue."

Dot your pyramid with fresh cranberries to add even more Thanksgiving color. Don't forget to eat this centerpiece for dessert!

The pilgrims celebrated the first Thanksgiving. Now they can celebrate it with you. Click next to learn how.

For more kids' crafts and fun activities, see:

Advertisement

Stand-Up Pilgrims

Pilgrims make an appearance at your Thanksgiving celebration.

This Thanksgiving, put these stand-up pilgrims all around the house in surprising places.

What You'll Need:

  • Stiff cardboard
  • Pencil
  • Scissors
  • Markers
  • Felt
  • Glue

Who's that standing on top of the television? Who's hiding behind the sugar bowl? Is there someone standing next to the faucet of the kitchen sink? Why, they're pilgrims! And they seem to be standing around all over the house!

Advertisement

Make lots of these cutout figures, and place them in your home to create a thankful Thanksgiving mood.

For each pilgrim, draw a 6- to 8-inch-high person. At the bottom of each figure, draw a rectangular base a little wider than the person's body.

Draw on hats, breeches, buckled shoes, and long dresses such as the pilgrims wore. You could also cut out the pilgrims' clothes from felt and glue them onto your figure.

Then cut out your pilgrim with its rectangular base attached. Cut a vertical slit in the bottom center of the rectangular base. Then cut out another same-sized rectangle from cardboard, make a vertical slit in the middle

of the top, and insert it into the other slit to make a cross-shaped base.

Now, who's that standing around? Why, it's Miles Standish!

Yams are a traditional food at Thanksgiving. But did you know that they can also be used in a neat craft? They can -- find out how, next.

For more kids' crafts and fun activities, see:

Advertisement

Yam Vines

Watch a yam grow after your Thanksgiving feast.

Save the tops from your Thanksgiving yams, and watch them grow into vines.

What You'll Need:

  • Yam (or sweet potato)
  • Knife
  • Vegetable brush
  • Toothpicks
  • Jar
  • Water

This is such a pretty Thanksgiving plant, and so easy to grow. The top of a long, skinny yam will work best for this. Cut off the bottom third of the yam (have an adult help you). Scrub the top well with warm water and a brush.

Advertisement

Stick four toothpicks into the center of the yam top so that it will sit in a jar full of water with half of it poking out the top. The cut part should be fully in the water.

Place the jar in bright light, but not direct sun. Check your yam every day to make sure that the water always covers the cut part. Turn your yam so that all sides get even light.

After about a week, you will see stringy white roots growing out of the cut part. Soon, purplish leaves will sprout from the top. If your water gets cloudy, pour it out and refill the jar. The yam vine will grow fast, and soon the leaves will be bright green.

Transfer the plant to larger and larger jars as the vine grows and grows and grows.

Next, learn to make a craft that your whole family will be thankful for.

For more kids' crafts and fun activities, see:

Advertisement

Thankful Message Box

Help the family get into the Thanksgiving spirit with this message box.

What You'll Need:

  • Shoe box
  • Tissue box
  • Paints
  • Paintbrush
  • Assorted decorative art supplies
  • Pencil
  • String
  • Tape
  • Small slips of notepaper

When the pilgrims first harvested crops in their new country, they held a big party to celebrate and give thanks. When your family sits down to a big Thanksgiving dinner, everyone's stomach is probably very grateful for all that delicious food.

Advertisement

But what else are people thankful for? The week before Thanksgiving, paint and decorate an empty shoe box and tissue box.

Tie one end of a string around a pencil, and tape the other end to the tissue box. Set a stack of notepaper next to the pencil. Invite family and friends to write down what they are thankful for, and put the slips inside the tissue box.

On Thanksgiving Day, take turns reading the slips aloud. The shoe box can be used to store the slips, adding a new bunch of "thankful messages" each year.

You may want to paint traditional Thanksgiving symbols on your boxes, such as turkeys, pilgrims, Native Americans, and harvest foods, such as corn, pumpkin, squash, and apples.

You can print the words "Give Thanks" around the opening of the tissue box and the words "Our Thanks" on top.

Candles are found in almost every home during the holidays. Next, you'll learn how to make some interesting holders for your Thanksgiving candles.

For more kids' crafts and fun activities, see:

Advertisement

Harvest Candle Holders

Harvest Candle Holders Thanksgiving Craft

Celebrate the harvest this Thanksgiving with these candle holders.

What You'll Need:

  • Apple, orange, or grapefruit
  • Apple corer or knife
  • Candles
  • Raisins
  • Toothpicks
  • Cloves

Choose the right fruit for these candle holders by making sure the fruit can sit securely on a plate. Use an apple, orange, or grapefruit.

Advertisement

Have an adult help you make a hole in your fruit that is large enough for a taper candle to fit snugly inside. The hole should go almost to the bottom of the fruit.

Have the adult light a match and drip some warm wax into the hole. Press the candle into the wax before it cools. This will keep your candle from falling over.

Now make pretty designs on your fruit by sticking raisins on toothpicks or cloves into the flesh (break the toothpicks in half). You may want to alternate stripes of cloves with stripes of raisins.

When you are done, ask an adult to light your candle, and use it for a festive, flickering centerpiece for your holiday meal.

Pilgrims play an important role in the Thanksgiving tradition. Learn to create Pilgrim pictures on the next page.

For more kids' crafts and fun activities, see:

Advertisement

Pilgrim Seed Pictures

Pilgrim Seed Pictures Thanksgiving Crafts

We know you're in a rush for Thanksgiving to come, but it will take patient hands to make this 3-D pilgrim picture.

What You'll Need:

  • Poster board
  • Markers
  • Glue
  • Sunflower and pumpkin seeds
  • Lentils
  • Uncooked spaghetti

From tiny seeds grow mighty trees -- and mighty pilgrims, too.

Advertisement

Draw a large outline of a pilgrim on a piece of poster board. Give him a hat, knee breeches, a shirt with a collar or a short jacket, a belt, long stockings, and shoes.

Glue the seeds one at a time to fill in the outline. Overlap the seeds to fill in all the gaps. Use sunflower seeds for the black hat, shoes, and belt. You can color pumpkin seeds with markers to fill in other areas. Lentils can be used for the eyes, nose, and mouth.

Break pieces of uncooked spaghetti to glue on for the hair. You will have to work carefully to make this picture, but you'll have the patience of a pilgrim when you are through.

Everyone knows yams are a delicious part of Thanksgiving dinner. But they can also be eaten for breakfast. Next, you'll learn a savory and easy yam recipe.

For more kids' crafts and fun activities, see:

Advertisement

Yummy Yammy Muffins

Everyone at the Thanksgiving breakfast table will be thanking you for these yummy, yammy muffins.

What You'll Need:

  • 4 tablespoons sweet butter
  • 1 cup canned yams
  • 1-3/4 cups whole wheat flour
  • 1/2 teaspoon salt
  • 1/2 cup brown sugar
  • 2 teaspoons baking powder
  • 2 eggs
  • 4 tablespoons sweet butter
  • 3/4 cup milk
  • 1 teaspoon cinnamon
  • 1 teaspoon nutmeg
  • Measuring cups and spoons
  • Saucepan
  • Fork
  • Mixing bowl
  • Muffin tin and cups
  • Honey or jam

These muffins are a snap to make. Have an adult preheat the oven to 350 degrees and melt the butter over low heat. Mash the yams in a bowl. Combine all the ingredients, and mix well.

Advertisement

Pour the batter into muffin cups in a muffin tin. Bake for about twenty minutes. Let cool a little before serving with honey or jam. Breakfast has never been so yummy, or so yammy.

Pilgrims spent the first Thanksgiving with Native American friends. You can bring that spirit to the holiday table with the next craft.

For more kids' crafts and fun activities, see:

Advertisement

Headdress Napkin Rings

Thanksgiving napkin rings dress up a table.

These napkin rings will help your holiday table honor the people who made Thanksgiving possible.

What You'll Need:

  • Cardboard paper towel tube
  • Scissors
  • Markers
  • Construction paper
  • Craft feathers
  • Glue

The Native American people helped the pilgrims survive by teaching them about the different foods that grew in this land. The holiday of Thanksgiving started with a big dinner that celebrated the first harvest as well as the new friendship between the Native Americans and the pilgrims.

Advertisement

Remember the role of the Native Americans of long ago at your dinner this holiday with these pretty napkin rings.

First cut a 3/4-inch-wide ring from the cardboard tube for each napkin ring you want to make. Use markers to color the rings, and draw Native American designs all around them.

Draw and cut tiny feathers from construction paper, and fringe their edges with your scissors to make them look more feather-like. You can also use craft feathers or a combination of both. Glue the feathers inside the napkin ring.

When the glue dries, slip the rings over rolled napkins and lay one across each person's dinner plate.

There are many famous parades on Thanksgiving Day. Now you can add yours to the list. Keep on reading.

For more kids' crafts and fun activities, see:

Advertisement

Balloon Parade

With balloons and your imagination, you can hold your own Thanksgiving Day Parade.

What You'll Need:

  • Balloons in assorted sizes, shapes, and colors
  • Glue
  • Permanent markers
  • String

Blow up lots of different-colored and shaped balloons. You may need an adult to help you do this.

Advertisement

Glue several balloons together to make animals and your favorite cartoon characters. Draw on faces and clothes.

Tie a long string to each animal or character, and march your balloony creations outside in a neighborhood Thanksgiving Day Parade.

Make a big turkey and a pilgrim. Make your family dog. Is that Superwoman flying so high in the sky?

(Caution: Balloons are choking hazards. Keep them away from small children and pick up all broken pieces immediately.)

Humans aren't the only ones to be thankful at Thanksgiving. The neighborhood birds will sing their thanks after you learn the next craft.

For more kids' crafts and fun activities, see:

Advertisement

Birdie's Thanksgiving House

Let the birds have a Thanksgiving feast, too.

Give your local birds something to be thankful for by building them a Thanksgiving birdhouse.

What You'll Need:

  • Milk carton
  • Waterproof paint
  • Wooden dowel or craft stick
  • Glue
  • String
  • Scissors
  • Bird seed

Everyone loves a Thanksgiving feast -- even birds.

Wash and dry a large milk carton. On one side, trace and cut out a round hole big enough for a bird to pop through.

Glue a dowel or craft stick below the hole so the birds will have a place to sit outside their house.

Now paint the birdhouse in pretty colors. Write the words "Thanksgiving House" on the sides if you want.

Fill the bottom of the birdhouse with bird seed. Then have an adult poke a hole in the top. Thread the hole with strong string, and tie it to a tree branch that is easy to see from your window. Watch the birds come and celebrate!

You'll probably have a lot of drawings and art work from all of your holiday crafts. Show them off using the magnets you'll learn about next.

For more kids' crafts and fun activities, see:

Veggie Magnets

These veggie magnets are a great Thanksgiving craft for kids.

Put your Thanksgiving photos on the refrigerator with the help of these veggie magnets.

What you'll need:

  • 10x10 inches adhesive-back shelf paper
  • Tape
  • 20 wood craft picks (3-1/2 inches long each)
  • Ruler
  • Pencil
  • Scissors
  • Acrylic paint (brown, orange, green, yellow, white)
  • Paintbrushes
  • 4 mini wood craft sticks (3/8x2-1/2 inches each)
  • Fine-point permanent markers (black, red)
  • 8 wiggle eyes (5mm each)
  • Tweezers
  • Craft glue
  • 1/2x2-1/2-inch strip adhesive-back magnet

Remove the backing from the shelf paper and place it onto a flat surface with the adhesive side up. Use tape to hold down the corners.

Measure and mark 1/2 inch from the pointed ends of five craft picks. Cut each pick at the marking. Place the pointed pieces on the shelf paper to hold while painting.

Paint four pointed pieces brown for the onion roots and one piece orange for the tip of the carrot. Lay all the remaining craft picks and sticks on the shelf paper, leaving a little space between each piece.

Paint all the remaining craft picks green. Refer to the illustration to paint the mini craft sticks for each vegetable. Let dry one hour, then turn over and paint the back sides. Let dry one hour.

Use permanent markers to draw the faces and markings on each mini craft stick and on the craft picks for the carrot top. Glue on the wiggle eyes (you may want to use tweezers to help you glue on the eyes).

Cut the green craft picks to various lengths to create the leaves and stems. Glue the pieces onto each mini craft stick.

Use scissors to cut the magnet strip in half lengthwise. Then cut each piece in half widthwise to create a total of four narrow strips. Remove the strips' paper backing and adhere to the back of each vegetable.

Hang this harvest of magnets on your refrigerator during autumn or all year long.

A handwritten Thanksgiving card is always special, but when it's on handmade paper, it's extra-special. Keep reading to learn how to make this special paper.

For more kids' crafts and fun activities, see:

Handmade Paper

Make paper pulp in a dish-pan.

Write your Thanksgiving cards on this handmade paper. You'll want to have an adult around when you make this craft.

What You'll Need:

  • 5x7-inch wood picture frame
  • 8x10 inches coarse nylon net
  • Staple gun and staples
  • 1-gallon bucket
  • Large brown paper grocery bag
  • Large slotted spoon
  • Blender
  • Deep plastic dishpan
  • 21x21 inches old sheet
  • 20x20 inches flat, smooth, or nonporous plastic or similar material
  • Sponge
  • Clothesline and clothespins

Ask an adult to help you staple the nylon net across the back of the picture frame, stretching the net tightly. Set aside. Fill a bucket halfway with warm water. Tear the grocery bag into 2-inch squares. Drop the pieces into the bucket of water and stir with the slotted spoon. Let soak 1/2 hour.

Add the soaked paper to the blender with an equal amount of water a little at a time. Don't overload the blender, and use plenty of water.

Have an adult help you blend the paper on low speed, then medium speed until it becomes pulpy. Don't over-blend. Fill the dishpan halfway with warm water. Pour the pulp into the pan.

Do this in one smooth, continuous motion. If the pulp is too lumpy or has holes, dump it back into the pan and start over.

Once the pulp is stuck to the sheet, pin the sheet to the clothesline until the piece of paper on it is dry. Then carefully peel away the paper.

Make more pieces and put them together to make a notebook, or use your handmade paper for writing notes. You could also make a fall collage on the paper with real leaves or leaf cutouts (see the leaf stencils you can download here for ideas).

Hold the frame horizontally, net side up. As you lower it into the pan of pulp, tilt it down and scoop under the pulp, moving it away from your body. Tilt it horizontally under the water and lift up, shaking it slightly.

Let the pulp on the frame drain for a moment over the pan. Wet the sheet and smooth it onto the flat plastic, removing any air bubbles. It's important that the sheet be flat and stuck to the surface; if not, the pulp will not come off the netting later.

Turn the frame with the pulp upside down and set it onto the wet sheet. Use a sponge to press out as much water as possible. Do not rub.

When most of the water has been removed, lift the frame away from the pulp. The pulp should stick to the sheet. If it does not stick or if there are holes, dump it back into the pan of pulp and start over.

On the next page you'll learn a handy craft for those cold autumn nights when you just want to curl up with a good book.

For more kids' crafts and fun activities, see:

Harvest Bookmark

Make a festive harvest bookmark.

Mark your place in your favorite Thanksgiving storybook with this holiday harvest bookmark.

What You'll Need:

  • Tracing paper or copier
  • Pencil
  • Scissors
  • Poster board (green, cream)
  • Construction paper (orange)
  • Markers (black fine-point, brown)
  • Craft glue
  • Hole punch
  • 12-inch length ribbon (1/4 inch wide)

Trace and cut out the bookmark frame pattern you can download here from the green poster board. Repeat for the bookmark insert pattern from the cream poster board and the pumpkin from the orange construction paper. If possible, use a copier to transfer the pumpkin pattern to orange construction paper so the detail lines will be visible. Otherwise, add the detail lines on the pumpkin with the black permanent marker. Color in the stem with the brown marker.Glue the pieces together, stacking them on top of one another. Let dry twenty minutes. Write HARVEST below the pumpkin with black marker.Punch holes on both sides of the stem, insert the ribbon through holes, and tie a bow at the base of the stem.

Next, you'll learn another way to spruce up the Thanksgiving table.

For more kids' crafts and fun activities, see:

Thanksgiving Napkin Rings

Thanksgiving Napkin Rings Craft

These napkin rings are a perfect addition to the Thanksgiving table.

What You'll Need:

  • Paper towel tubes
  • Ruler
  • Scissors
  • Construction paper
  • Craft glue
  • Craft supplies (markers, paint, paintbrush, ribbon, beads, feathers, etc.)

Measure and cut the tubes so each ring measures 2 inches in length. (Make enough so everyone coming to dinner has a napkin ring.) Cut the same number of 2-inch-wide colored paper strips. Glue the paper strips to the tubes.

Now decide how you want to decorate your napkin rings. You could make each different, or you could make them all the same.

Draw a turkey, autumn leaves, pumpkins, or something else you're thankful for on construction paper, and cut it out. Glue it to the ring.

Use markers, paint, ribbon, beads, and feathers to decorate the rings. Here is your chance to be really creative and fanciful.

How about drawing pictures of each family member for their own personalized napkin ring? Your artwork will be the talk of the table!

Each year pine trees shed their cones. Did you know this is a great time for crafts? Keep reading to learn about a pine cone craft.

For more kids' crafts and fun activities, see:

Pine Cone Trees

You can turn a pine cone into a fancy holiday tree.

It's easy to turn ordinary pine cones into these unique, sparkly Thanksgiving decorations.

What You'll Need:

  • Large pine cones
  • Craft glue
  • Paper plates or disposable dish
  • Shiny glass or plastic beads (about 1/4 inch in size)
  • Tweezers
  • Glitter

For beaded "trees": Set a pine cone upright on newspaper. Pour some white glue in a small dish. Hold a bead with a pair of tweezers and dip it in the glue.

Stick the bead on one of the cone bracts. Keep gluing beads on the cone until it is covered to your liking. Allow to dry.

For glittery "trees": Pour white glue into one paper plate and glitter into another. Roll the cone in glue first, then in glitter. Allow to dry.

If you'd like, you can make winter scenes with your trees. Set them on a sheet of white cotton or quilt batting to represent snow, and add some figurines. You can even use a mirror for a frozen pond and put your trees around it.

On the next page you'll learn how to make a cornucopia of crafts from a cornucopia.

For more kids' crafts and fun activities, see:

Cornucopia Copies

Cornucopia Copies Thanksgiving Craft

A cornucopia is a horn of plenty. Make your Thanksgiving cornucopia overflow with fruit and flowers, plus plenty of color and texture.

What You'll Need:

  • Pencil
  • Corrugated cardboard
  • Scissors
  • Poster board
  • Craft glue
  • Newspaper
  • Poster paints
  • Palette or paint tray
  • Small hand-roller (brayer)
  • Drawing paper

Draw a horn shape on a piece of corrugated cardboard. Draw fruit shapes such as a pear, a banana, grapes, and apples on cardboard.

Carefully peel a layer of paper off the side of the cardboard you have not drawn on to expose the inside ridges. Cut out the shapes. Glue the shapes on a piece of poster board, ridged side up. Let the glue set.

Cover your work surface with newspaper. Place poster paint on a palette or paint tray. Roll the brayer in the paint, then roll it over the cardboard shapes.

Place a piece of paper over the painted surface. Gently rub the paper with your hands. Remove the paper and let the paint dry.

Thanksgiving is a great time to give special gifts to loved ones. Next, you'll find out about a craft that will help you make a gift people of all ages will enjoy.

For more kids' crafts and fun activities, see:

Autumn Leaves Puzzle

This autumn leaves puzzle is sure to be a hit with your little brothers and sisters.

If you're looking for a great Thanksgiving gift to make for your little sister or brother -- here it is: An autumn leaves puzzle. It is easy to do and lots of fun -- everyone will be amazed you made it yourself.

What You'll Need:

  • White blank puzzle
  • Rubber stamps (squirrel, row of leaves and acorn)
  • Black ink pad
  • Colored pencils or markers (browns, golds, reds, oranges)
  • White paper
  • Pencil
  • Scissors
  • Sticky notes (optional)

Place puzzle on white paper, draw around it, and cut it out. Repeat several times. Use this paper to practice different arrangements with the rubber stamps.When you are satisfied with the design, apply black ink to the rubber stamp and print on the puzzle. Be careful not to slide the rubber stamp on the puzzle surface. Continue stamping until you have completed the design. Let the ink dry. (To use only part of a stamp -- as we did -- block off part of the puzzle with sticky notes and stamp the design you want between the notes.)Color your design with colored pencils or markers.If you blow up like a balloon after a big Thanksgiving dinner, you'll feel right at home with this next craft.For more kids' crafts and fun activities, see:

Pumpkin Balloon Fun

Pumpkin Balloon Fun

These bright and "airy" pumpkins will brighten up your house this holiday season.

What You'll Need:

  • Two long balloons, one orange and one green

Begin by inflating a balloon, leaving a three-inch tail. Inflate another balloon only one inch.On the longer balloon, pinch and twist a round bubble and two five-inch bubbles.

Twist two five-inch bubbles.

­ Bring the two five-inch bubbles together. Pinch and twist-lock.

Pinch and twist a five-inch bubble.

Pinch and twist a five-inch bubble.

Bring that bubble together with the other two. Gently push that bubble between the other two that have been twist-locked.

Push the bubble between the first two bubbles.

Repeat the last two steps three more times.

Push the first round bubble inside, as shown.

Slide the tail of the second balloon through the pumpkin twice.

Slide the tail of the second balloon through the pumpkin twice to secure the bubble into the twist-locked end, as shown.

Continue reading to learn how to make a silly bird that will entertain everybody at Thanksgiving dinner.

For more kids' crafts and fun activities, see:

Gooney Bird

Gooney Bird

Cluck, cluck, gobble, bobble. Give this goofy bobblehead gooney bird a chance to tickle your funny bone.

What You'll Need:

  • Yellow paper plate, 9 inch
  • Red paper plate, 6 3/4 inch
  • 2 wiggle eyes, 15mm
  • 2-inch orange pom
  • 3 yellow poms, 1/4 inch each
  • Chenille stems: 1 yellow, 2 orange
  • Craft feathers

Tools:

  • Craft glue
  • Scissors
  • Pencil
  • Paper punch

Fold the yellow paper plate in half, and run a line of glue along the inside of the fold line. Press the halves together, and set something heavy on top to hold the fold until the glue sets.

Cut the red plate into quarters; discard two pieces. Glue the two remaining pieces to each side of the folded yellow plate as shown.

Glue two quarters of the red plate to the yellow plate.

Glue two wiggle eyes to the orange pom. Glue the three small yellow poms together end to end, and glue this row to the orange pom just below the eyes to form a beak.

To make a springy neck, wind the yellow chenille stem very tightly around a pencil, leaving about two inches straight at the end. Slide the stem off the pencil. Put a dollop of glue on the straight end, and push it into the top of the fold at the front of the plate. Let dry.

Glue the head to the top of the springy chenille stem neck. Let dry.

Punch a hole on each side of the yellow plate along the bottom edge, about an inch in front of the middle.

Punch a hole on each side of the yellow plate.

Insert an orange chenille stem into each hole, and pull it halfway through. Bend each stem at this spot, and twist them to form a spiral. Stop about four inches before you reach the end, and twist and bend the ends to create webbed feet.

Use chenille stems to create the feet.

Insert several large feathers into the fold at the back of the yellow plate; glue in place.

A gooney bird is just one of the silly creatures you can make. Using different-colored plates and decorations, explore the possibilities. How about a hilarious horse whose head bobbles as it trots? Or a hopping, bobbling frog? What else can you dream up?

For more kids' crafts and fun activities, see:

ABOUT THE CRAFT DESIGNERS:

Orangey Popcorn Balls by Lisa Lerner, Kersten HamiltonStand-Up Pilgrims by Lisa Lerner, Kersten HamiltonYam Vines by Lisa Lerner, Kersten Hamilton"Thankful" Message Box by Lisa Lerner, Kersten HamiltonHarvest Candle-holders by Lisa Lerner, Kersten HamiltonPilgrim Seed Pictures by Lisa Lerner, Kersten HamiltonYummy Yammy Muffins by Lisa Lerner, Kersten HamiltonHeaddress Napkin Rings by Lisa Lerner, Kersten HamiltonBalloon Parade by Lisa Lerner, Kersten HamiltonBirdie's Thanksgiving House by Lisa Lerner, Kersten Hamilton

Advertisement

Loading...